


Restoring the Small Box Respirator Gas Mask
By Vincent Petty
For the living historian portraying the American soldier of the First World War, probably the most crucial and yet most difficult piece of equipment to acquire is the small box respirator gas mask. For the Doughboy reenactor there are few available resources for serviceable gas masks. Few vendors offer reproduction masks, and when produced, they are usually in small production runs selling out quickly. The use of original gas masks is even more difficult, because after nearly 90 years, those available are in such poor condition as a result of time and improper storage. However, the use of an original mask is a viable option and with just a little work an original mask can be made serviceable again. Recently I restored an original gas mask that was purchased off of E-bay, and through this article I would like to share the techniques that I used to make a serviceable gas mask for living histories and reenacting purposes.
Very rarely will one find an original gas mask where both the hose and mask are supple and pliable. However, a mask in this condition will be priced accordingly and honestly deserves to be preserved rather than used for reenacting. Usually an original gas mask is found in one of two possible conditions – with a supple and pliable mask and fried hose or with both a fried mask and hose. “Fried” usually refers to the hard and crumbling condition of the rubber in the gas mask and the hose, as a result of age as well as poor storage in attics for decades.
The mask that I restored was purchased on E-bay for $23.00. When the mask arrived I found that the rubber hose was hard and crumbled in places and that the rubber in the facemask was hard and flaking off, as was expected. In addition the elastic that held the mask onto the wearer’s head was worn out. (Figure 1 is a picture of the gas mask when it arrived and at the start of the restoration.)
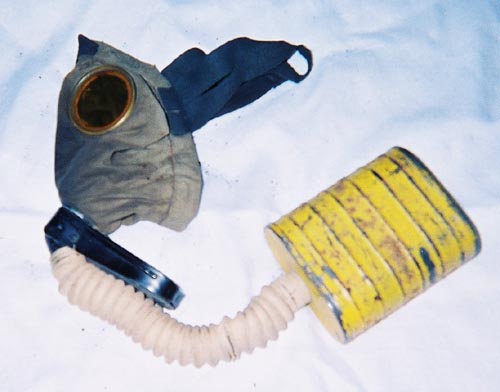
Figure 1.
I started the restoration by taking the mask apart and breaking the project down into its basic pieces – the mask, hose, and filter can. First I removed the tape that was found at the mask end of the hose and the filter can end. When the tape was removed, safety wire was found that actually provided the pressure to hold the hose to the mask and filter can. With a pair of needle nose pliers it was easy to cut and pull off the wire and with the wire removed I simply pulled the hose from the mask and filter can and discarded the old hose (If any of the hardened hose remains on the mask or can, a scraper can be used to scrape it off).
Once the gas mask was apart, I started working on the filter can. Using a flat head screwdriver I popped off the “lid” at the bottom of the can. This piece allowed air to be drawn into the filter can and through the filtering agent before the soldier breathed the air. Removing this piece allowed access to the interior of the can. Once removed I used screwdriver and needle nose pliers to remove all of the filtering material; which included layers of charcoal, cotton and wire mesh screens. Removing these is easy enough, just a little time consuming. Once the entire filtering agent was removed I sanded down the exterior of the can to remove the old paint and rust. (Figure 2 is a picture of the can emptied of filter agent and prepared for painting, while figure 3 is the newly painted filter can.). Once emptied and cleaned the last step was to paint the filter can. I selected “federal safety yellow” spray paint, which best matched the original yellow color of the filter can, and painted the can.
 Figure 2 |
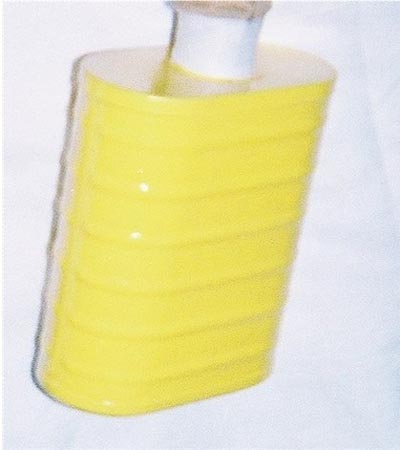 Figure 3 |
Once the filter can is completed the next step is the hose. What was needed was a ribbed hose with an opening diameter of about 1 1/8-inch. The replacement hose should match as best as possible the original. Finding a replacement hose may be tricky, but surplus Russian/Soviet, Chinese and East German gas masks are possible inexpensive sources for replacement hoses. Scuba diving shops my also serve as possible sources. For this restoration I was fortunate to find at a local junk shop, an old trashed 1950’s era US army gas mask with a suitable hose.
Having located a hose it then had to be covered in fabric. I stretched the hose down the length of a dowel rod with a diameter of 1 inch. Once stretched I tacked each end of the hose to keep it stretched at its full length (See figure 4). To cover the hose I used cotton muslin from a Red Cross triangle bandage. I cut it so that it would wrap around the hose with the seam running the length of the hose. With the material cut, I applied spray glue to the hose and applied the cloth to the hose and allowed to dry while the hose was still stretched. When the glue dried I removed the hose from the dowel and allowed it to contract to its normal length. When this happens you will find the fabric adheres to the contours of the ribbed hose just fine (see figure 5). To insure the match in the color of the replacement hose’s cloth covering with the original I chose to tint the replacement using Partha brand paint color “Asia” mixed with a small amount of water to thin out and then painted onto the cloth. Once dry it was a perfect match for the color of the original hose fabric.
 Figure 4 |
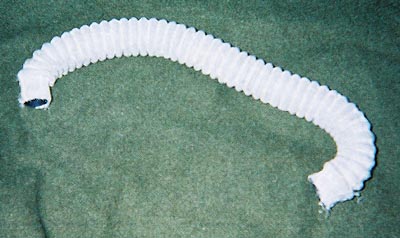 Figure 5
 |
Another option for covering the hose comes from Mr. Mickey Collins, who suggested “medical ‘stockenettes’ as used in Orthopedics is excellent for this as it is a light stretch gauze material. Right color and material weave too! This material comes on long rolls and is cut to length. Generally kept in the clean utility/supply room of a rehab or surgical orthopedic unit in any general hospital.” I am sure this can also be found at most any medical supply or surplus store.
Finally the mask was left. It was a little stiff and the rubber flaking out of it. I turned the mask inside out and with a small brush I worked out as much of the old rubber as possible. Simply passing the brush over the old rubber probably removed 90% of the crumbling rubber. The fabric of the mask itself still remained strong. I then washed the inside of the mask with a soft damp cloth, including the mouthpiece. To replace the original rubber I painted the interior of the mask with rubber cement and allowed it to dry and cure for two weeks. This solution approximated as best as possible the pliability of a mask with supple and pliable rubber. Another option may prove to be “liquid latex” now available in hardware stores for coating tool handles. After the cement cured the elastic was easily replaced. I have not yet found a suitable replacement for the flutter valve that is usually missing.
When all three components were finished they were assembled into the finished gas mask. The hose was slipped onto the mask and filter cans and new safety wire was used to hold each end of the hose to the mask and can and white medical tape was placed over the wire.
With the assembly completed I now had a mask very serviceable for WW1 living history and reenacting purposes (the mask of course is not intended to actually filter poison gas). Figure 6, is a picture of the completed mask. In the end the total project cost about $35.00.
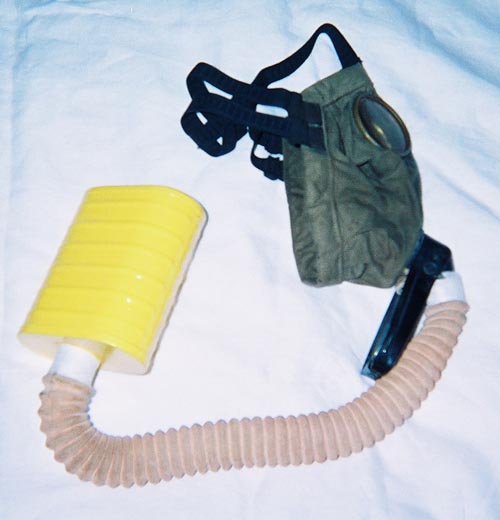
Figure 6