


Tent Pitching
FM 21-15 Care and Use of Individual Clothing and Equipment, January 1966
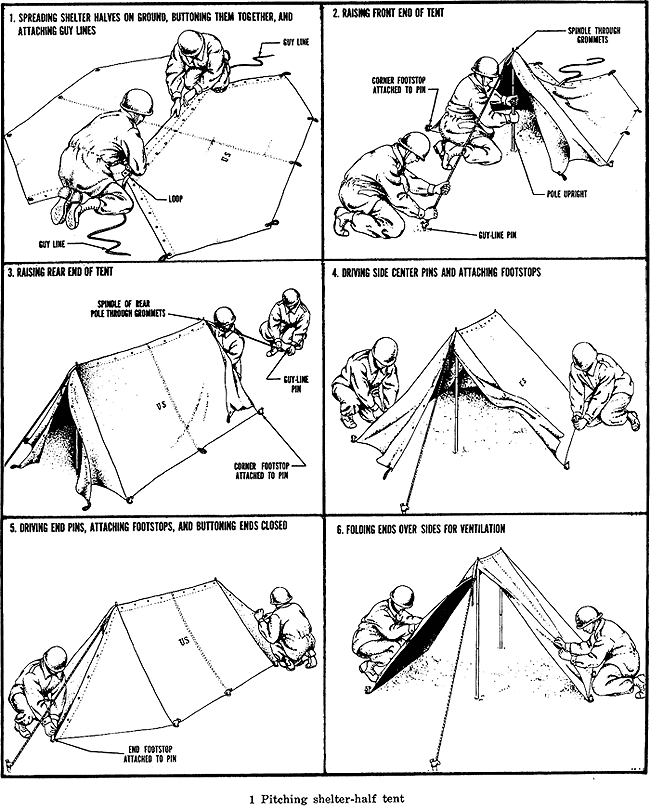
- Two-Man Tent.
- Pitching. Two men can pitch the tent in
5 minutes as follows:
- Spread two shelter halves on the ground, one with the buttons up and to the center; the other with the buttons down and to the center.
- Proceed as shown in figure 1.
- Striking.
- Open enough buttons so that the tentpoles can fall to the ground.
- When the tentpoles are down and the tent
is flat, remove the pins, unbutton all remaining buttons, disassemble
the poles, and untie the guy lines from the loops
at each end of the tent.
- Pitching. Two men can pitch the tent in
5 minutes as follows:
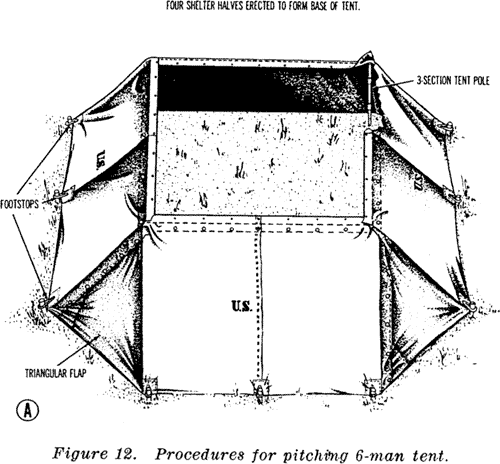
- Six-Man Tent. To join six shelter halves, refer to figure 12 and proceed as follows:
- Erect four shelter halves together in a square, using four standard 3-section tent poles at each corner (A). This forms the base of the tent. Lap and tie down the triangular flaps on three corners, leaving the fourth corner triangular flaps open to form a door (B).
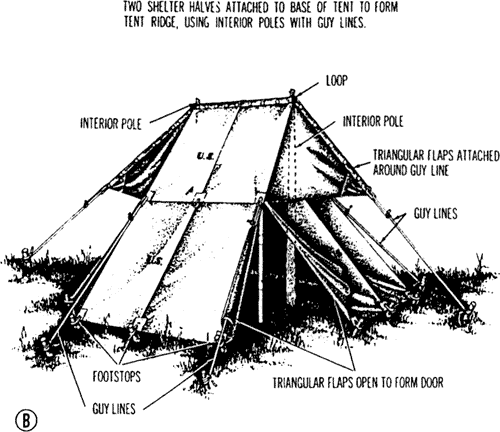
- Attach the two remaining shelter halves together along the ridge of the tent. These form the cop section of the tent when attached to two sides of the base of the tent (B).
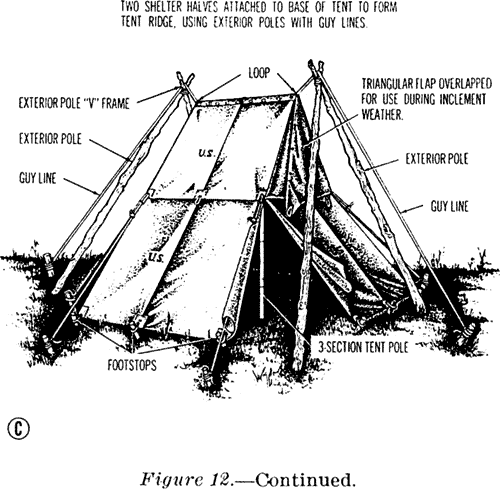
- When using the interior-pole method (B), insert a pole inside each end of the upper section as illustrated. Tie a packboard lashing rope (or the equivalent) to the loop located at each end of the shelter half ridge, leaving approximately seven feet of each rope end extending inside the tent. Use the remaining outside portions of the ropes as guy lines. When using the exterior-pole method (C), cross two poles outside each end of the tent as illustrated. Tie a double square knot approximately seven feet from the end of each packboard lashing rope. Insert the long end of each rope through the two grommets at each end of the upper section of the tent, leaving the 7-foot sections inside the tent. Provide guy lines by stretching the long end of each rope over the "V" formed by the exterior poles.
- Tie the end of each inside 7-foot rope to the loop located at the opposite end of the upper section of the tent. These form interior clotheslines.
- In hot weather or when ventilation is desired, attach the triangular flaps of the upper section of the tent together around the guy lines (B).
- When protection from wind, rain, and snow
is required, close the triangular flaps of the
upper section of the tent by overlapping and
attaching one triangular flap over the other
(C).
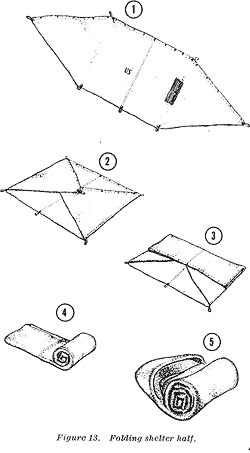
- Folding and Carrying.
- Folding. To fold the shelter half, refer to
figure 13-and proceed as follows:
- Spread the shelter half out flat with button side down. Place tentpole sections, pins and guy lines in center of wide side of either triangular end (1).
- Fold triangular ends toward center with pointed ends overlapping (2).
- Working at either unfolded side, fold lengthwise, bringing the edge over one-third the width of the shelter half (3). Fold other unfolded side over in the same manner.
- Starting at the end where the tentpole sections were placed, roll shelter tightly and evenly until about 6 inches from the end (4).
- Fold back all except bottom ply on the opposite end to form a pocket or envelope. Tuck rolled portion into envelope (5).
- Carrying. Carry the rolled shelter half under the expendable flap of the field pack, attached to the bottom of the field pack, or inside the duffelbag.
- Folding. To fold the shelter half, refer to
figure 13-and proceed as follows: